Sunday, May 4, 2014

Community

Community is important. It's what helps to shape us and who we are.  It influences our decisions, gives us support and allows us to feel at home whether things are good or bad.  I have many different communities in my life, be it work, sports, family, NSBE or just life.  What I was missing and what I found yesterday was my sewing community.

So to sum it up, yesterday was a freakin fantastic great day!  I went to a class put on by Jennifer from Workroom Social for sewing a Dolman Sleeve Blouse that was being taught by Marcy of OonaBalloona.  I've followed her blog for a while now and I've always been impressed by her style, skill and confidence.  So of course when i heard there was a class being taught by Marcy in NYC, i hopped on that train (literally) and used it as a great excuse to go fabric shopping, learn some stuff and make some new friends.

The ladies from our Blouse class. Fiona, me, Aspen, Jen and Marcy

So yeah, the whole making new friends part, that ties into the sewing community she-bang.  After the class, Jennifer hosted a fabulous sewing party/meetup/swap thing and I must say, I've never met so many great creative women in one place at one time. With over 30 people in one place and me feeling as though I've known a handful through semi-cyber stalking them through my Feedly account (fyi, i inspire myself every day by reading what people have created and showcased on their blogs, and then i feel like a "failure" for not spending enough time to create things myself), I truly had an amazing time.  Wanett, Carolyn, Devra, Gail, Aspen, Marcy, Fiona, Jennifer, plus the many more that my terrible memory is failing to remember. It feels good to meet the people that you read about, that you hear about and that you admire, for all they create in addition to the things that they do in "real" life.  I'm hoping that we all keep in touch (that I blog a lil more so people know I'm alive) and that I have reasons to jump on the train and get to NY more (and hopefully not spend the $$$ that I spend every time I go).

The attendees of the Social

Thanks to Jennifer and Workroom Social for putting the event on and making this possible, Thanks to everyone that came out and I'm especially thankful that I was able to meet a great bunch of people who will continue to inspire me and that have helped me to feel a sense of community for the creative side of my life!
Marcy and I

Update: Jennifer posted pics up from the party on her site. Check em out!
http://workroomsocial.com/blog/manhattan-pop-party-pictures/

Sunday, March 30, 2014

Aerial Star light

My sister knows that I sew. However, I'm a terrible sister and have never made anything for either of the two that I have (must do better!). This one particular sister also knows that I tend to procrastinate about things which had led to some trust issues about requesting things to be made, but I'm glad she changed her mind on this one.

She does aerial arts and has recently started competing. Last year she had a costume made by someone that she paid a few hundred bucks for. When I saw the video of her performance and then finally saw the finished garment, I was surprised at the level of workmanship on the garment in relation to the price that she charged. I haven't sewn with to many knits so far, but I immediately figured I could do better. So sis and I talked about it and came up with a design that would be able to work for her next completion. I was excited (yay, she's letting me do something for her!).

So in usual Afro fashion, I procrastinated, but I was able to finish the garment a week before the competition. I used Jalie 3134 and modified it so that the sides were cut out. We used a blue swimwear fabric along with a sheer sparkly black for the contrasting panels and was lined with a lovely swimsuit lining (Helenka swimsuit lining) from NYfashioncenterfabrics.com (i'm only disgruntled that the shipping cost is practically the same as the cost of the fabric, but it was worth it). The hand of the lining is great and sewed like butter when I interlined it with the blue fabric for the center bodice. I also modified the back geometry so that more of her back is exposed by reducing the rise of the lower panel. I found that the pattern runs a little small; my sister has a longer torso than me but when I tried it on myself for fitting, it fit me perfectly. The size ended up working on her but I'll take this into account next time. I also need to work on my elastic application skills. I messed up but I know the general idea of what I did wrong so that I can fix it for next time.  

I'm posting some stills from her performance, I think the costume looked great, and I was especially happy since this was the first time i'd ever sewn a garment like this. (fun fact, this is all sewn on a regular machine). Just a warning, there's some serious muscles about to be shown in these pics so try not to be as jealous as I am of her!


True Silky Blue

So this is waaay late. Sorry, last year was rough and I haven't been creating as much as I would like. I ended up taking a day off from work to work on this dress. It was a good day, sometimes I forget how much like to make things and how much and long I can focus on something when I enjoy what I'm doing. 

I was a little nervous getting into this pattern. I haven't seen any reviews on it online and the ones I did see did not have a ringing endorsement. I cut into my muslin feeling confused. The instructions keep referring to the pieces by names that don't exist, notches were in the same category and they kept saying weird things like seam numbers. Then I had a revelation, those numbers by all those circles actually mean something, those were the seam numbers! I don't think you all understand the amount of relief that went through my head; all of a sudden everything made sense (there might have been an actual trumpet fanfare sounding in my head).  Yay for muslins!

The fabric arrived the Tuesday before the wedding, as expected, and it was exactly what I wanted, a nice lightweight silk which felt great between my fingers. There were some white stripes in the material which went away with the first ironing. I cut out all my pieces and immediately went to work. Things went pretty smoothly. It wasn't until I went to zip it up that I realized I might have cut too large of a size. Luckily it seemed to pull together well with just taking in the back seam. However, I must note this, when making a strapless dress, especially one with weight that you plan to dance in, it's not a bad thing for it to be very fitted.  It took a few tries to get the boning right, but this second time (first while making Gertie's pencil skirt), went smoother and adds the right support to the bodice.

I made it a tea length dress and used some African print fabric for the waist inset. I mixed and matched the pattern. Originally it called for the waistband to bet touched to go with the rouched bodice but I needed something more simple to show of the print off the fabric. If I had time, I would have made a purse with the same material to wear with it but I was cutting it close and just haven't gone back to that project yet. However, I did splurge with my time and decide to add some piping with the same material. 


I made the rouching on the bodice with the baste and pull method. That part turned out well though it did take some effort to ensure that they were spaced well. Next time when I'm not pressed for time (if that ever happens) I'll try using the ruffler that I've owned for almost 3 years (I bought a kit of foots for the invisible zipper and haven't used ANY of the other feet yet.)


The silk itself was pretty easy to work with. This pattern used a LOT of fabric with the skirt being gathered at the waistband and lined. I had some issues hemming the lining of the dress, my machine started chewing it up so I left out unhemmed for the wedding and just using safety pins to keep out from peeking out. After the wedding I called a few swimming machine repair shops about a tune up and one VERY nice repair man suggested I try changing the tension before I brought it to him. Guess what: it worked. I felt like a fool floor not having played with that earlier but I was able to roll been the rest of the lining with no issues.

The dress wore well the day of, I'm glad I spent the time making it and I hope you all like it as much as I do!


Monday, September 23, 2013

Under Pressure

So it would seem (and by seem, I mean that it's totally true), that I like to procrastinate and work decently okay under pressure.  My previously mentioned friend who's getting married in a few weeks (3 weeks), asked me to be the hostess/greeter of her wedding.  She was kind enough to give me free reign to create my own dress. The two dresses that her brides maids are wearing are these.


My thought is to make something similar.  I found a pattern at JoAnn's, Burda Young 7388, that is carries some of the same style elements.

I'm going to do a mix of the two, a gathered sweetheart neckline bust but a flat waist and a gathered skirt.  The material is a dark blue silk dupioni from fabric.com and will be lined with a black polyester lining. I'm actually going to belt the dress with a blue African print fabric that I bought and I'm hoping it's not going to look like too much with the gathers and the belt. And I was thinking of piping the top of the neckline and the seams for the waist in the print fabric to tie everything together.

I haven't seen too many people make this dress up on the interwebs and the ones that do seem to run into some issues with the pattern pieces.  I'm going to muslin this up since this is the most expensive dress I've had to make since I started and take care of some fit issues in the bodice.  It's boned and I'm not too adept at it, only used it once, so we'll see what happens.  All in all, i'm excited and a bit worried.  Fabric should be here in a couple days and then it's off to the races!  I'll let you know how it all goes!

Saturday, September 14, 2013

Look Up! Laurel Blue

Earlier this year I picked up the Laurel dress from Colette Patterns. I had been in a sewing slump and figured that this simple dress with only 4 pattern pieces would be a quick fix to pull me out.

Six months and one non-related skirt later and I finally started and finished it. I started with a different fabric choice but ended up going with something a little lighter and more summery.  I picked up this fabric from Fabric Mart.  Its currently my favorite place to buy fabric online, I like how they drape the fabric to give you a sense of what you're buying.  My fabric knowledge isn't good enough to buy things on name alone.  I think this is a Marc Jacobs fabric that I found on sale.  It's really thin and drapes well and my attempt to make it out of one layer was quickly shot down by my common sense.  And I'm glad I listened, this fabric is SUPER thin for a non silky.  Ripping out stitches left holes that had to be coaxed out. I underlined the dress in another Fabric Mart find and left the sleeves without the lining to lighten it up.


Pattern-wise, it was indeed simple.  The things that took the most time were the hand stitching and making my own bias tape.  Woo hoo for my first time making bias tape.  I found this really great tutorial that I previously pinned on Pinterest on creating appx 5 yards from a fat quarter and i immediately jumped to it. It was pretty simple expect I got some of the measurements wrong which made it so that I couldn't pull it through my bias tape folder thing.  Which meant I had the pleasure of hand folding and ironing the entire strip (yay me).  Thank goodness for TV, Netflix and the first season of 24.

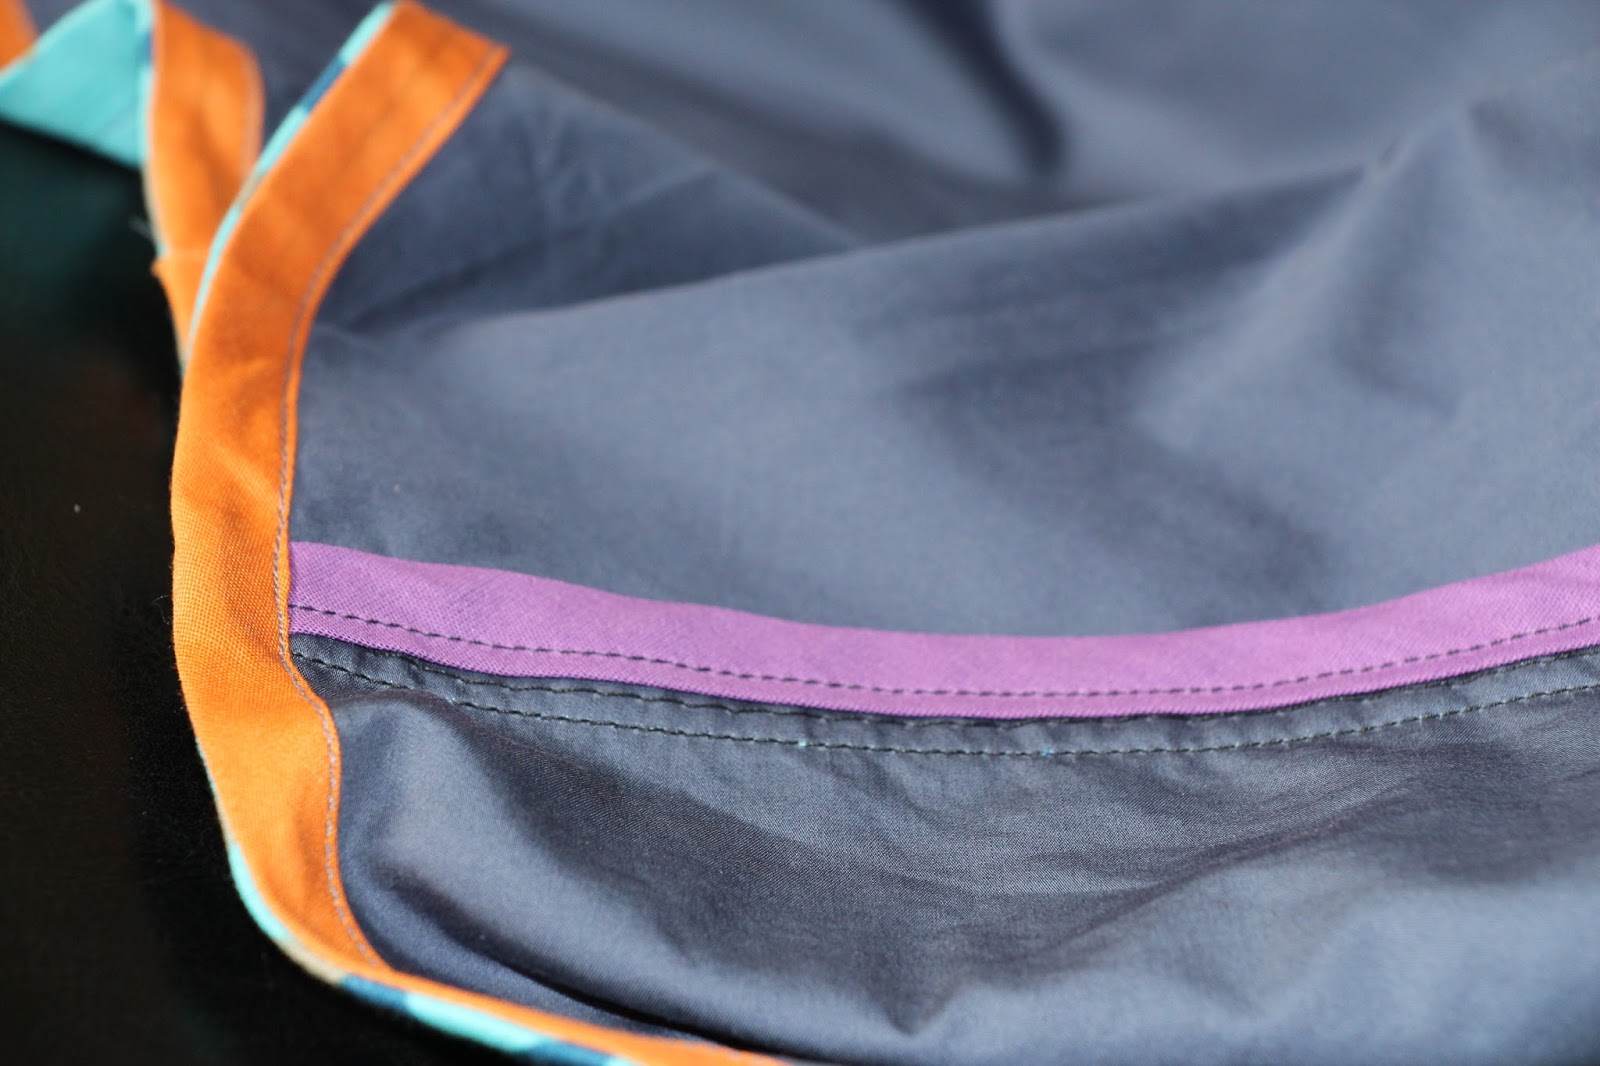
I enclosed all my seams with store-bought bias tape and overlooked the arm sleeves. One thing to mention was the way the sleeves were built.  The pattern indicated to make 3 rows of basting stitches along the top which we then pulled on to ease the sleeve into its arm hole.  I had never seen that before and I enjoyed the finished look with tiny gathers across the top.

Bias Tape binding:  The black is the center back seam, the orange is single fold tape along the hem. 

Bias Tape binding:  Purple Double Fold Bias tape binding along the side seams.


The only alteration I made to the dress was to add darts on the front.  I'm not used to super look fitting dresses, especially if they're not cotton.  I was prepared to make this a simple shift dress but after pinning the front, I liked it so much and couldn't NOT add the darts.  I left them open to create a sort of pleat, which was inspired by A Handmade Wardrobe. I haven't yet decoded if I'm going to iron the pleats in or just let them fall where they may but I would like to add some sort of visual interest in order "seal" the end of the dart.


All in all, I really enjoyed sewing this dress and I've already worn it once and I'll be sure to wear it again. I hope you enjoyed my selfies!  The light wasn't what I wanted it and I don't know my camera well enough to compensate for it yet, but I'm working on it. Continuous improvement!

Sunday, September 8, 2013

Bridal Showers

So, this post is in recognition of my failure as a budding blogger to take decent pictures of my creations.  I will do better.  But in the meantime, you will see terrible pictures of things that I created yesterday for a good friend of mine. She's getting married in a month and I'm uber happy for the current couple/soon-to-be-newlyweds.  

This is only the second bridal shower that I've been to and the first one that's been a female only affair.  In classic Renee fashion, I waited until the last minute to think of gift ideas and started brainstorming 3 days before the scheduled event.  Also, in true Renee fashion, everything worked out thereby continuing to enable her bad habits.  I wanted to create something personal, that would be remembered and that she could see and use everyday.  Those discounted the usual items that I THINK get given at bridal showers, such as lingerie.  Given these restrictions, I decided to consult with my dear friend, Pinterest.  Oh Pinterest, how I covet thee.  Thankfully, i have enough spare time (cough) to scroll through a forever scrolling webpage of ideas that pop up when I type in 'Bridal Shower'. They ranged from terrible involved to just not being right, but after xx amount of minutes hours, I was able to come up with 3 gifts that would amount to less than $50 in monetary value (i think, I didn't really do the math) and would take me less than 6 hours to do.  Since I would be starting these projects on Thursday, everything would work out fine.

Unfortunately, I was unable to procure one of the necessary items for gift number 1, but fortunately, gift number 1 was the most time consuming and was instead replaced by an equally good one (that got blessed by the groom) and was a hell of a lot simpler.  I still ended up making three items and they all turned out well, if I do say so myself. Presenting....

Gift #1


These magnets are of cities that they've been to together.  Zurich in Switzerland, Cancun in Mexico, St. George in Burmuda, Ponce in Puerto Rico, Cincinnatti, OH (where the Groom is from) and Manasas, VA (where the Bride is from).  I decided to do the cities because it's pretty easy to remember the countries you travel to, but a lot of times (at least for me), the cities are forgotten.  This way it will be a constant reminder/quiz of where they've been. As their travels increase, I'll possibly consider building on the collection. 

Gift #2


This picture frame lists famous couples in history and in story with the couple's names front and center.  I spray painted the frame purple as it's the Bride's favourite color and knew she would find a good place to put it.  I made sure to include some recognizable African couples as well though I didn't include as many as I would have liked. 


Gift #3


CC stand for Chris & Candace and i put their last name on it.  I played with just putting CJ as a universal nickname, but I felt as though the Groom has had that name for so long that people would automatically associate it with him.  The CC helps to establish their union along with sharing the last name.  The symbol on the right is an Ghanaian Adinkra symbol "Eban".  It is a fence which symbolizes "Love, Safety and Security".

This was the centerpeice.  I FINALLY used my Silhouette Cameo for good (and not pack rat evil).  I've had this thing for almost two years and prior to yesterday, had yet to put it to good use.  With the discovery that a $2 roll of contact paper from Big Lots is a cheap alternative to throwaway stencil material, I'm hoping that hurdle has been jumped and I'll continue to find good uses for it.  It was simple to use, a little tedious at the weeding out process, but intuitive and worked out well.  I still need to figure out how to properly import some images into the software but it worked out well.  

Gift #4

This was because I tend to go overboard, but I needed something to "wrap" the casserole dish in and this "Market Tote" at JoAnn Fabric's was 60% off so I grabbed it.  It folds up nicely and will definitely be put to good use. Note to self: always walk with JoAnn coupons in purse

All in all, it took me about 6 hours including shopping and travel time to complete all of these, and a good chunk of that time was trying to find the parts to the cutting machine and the remainder of my supplies that I KNOW I own but hadn't touched since I moved here. The Bride loved it and I LOVED seeing the expression on her face when she realized the thought that went into each of the gifts.  It's reactions like those that make me love what I do and inspire me to continue putting in the extra effort to make things that people will use and enjoy. 

Sunday, June 16, 2013

Ketchup & Mustard Hourglass Pencil Skirt

It's been a rough year creation wise for me.  I haven't felt inspired to follow through with any of the things on my sewing wish list.  But things are getting better.  Which is good.  My baby sister graduated from Wake Forest this past month and it was just the incentive that I needed to make my first garment for the year.  I went back to a pattern that I knew, a pencil skirt from Gertie's New Book for Better Sewing.  I already loved the first version that I made of this skirt, a simple black high-waisted in some sort of black polyester that looks great with a blouse tucked in for work.  The version I wanted to make this time however was more simple.  I wanted to use one of the African print fabrics that I've been stashing up but too scared to cut into.  I also didn't want to bone this version as it took some time last time and I wasn't exactly ready to try to perfect the mistakes that I made on the last one (the front panel doesn't exactly sit flat).

I picked up this light material in NY a year ago, it was the last fabric on the bolt and an impulse buy.  I cut this version shorter than the last and interlined it with black broadcloth to make it opaque.  I accidentally cut it a little too short so decided to use bias tape to finish the hem without losing length.  I'll have to make a decision in the future about the use of the back slit, the length of the skirt and the slit make for some interesting geometry. I finished the inside seams with bias tape as well, making the interior clean and not something I'm embarrassed to show anyone.